Tutorial: Sign Code Using the Trial Environment
This is Part 2 of the tutorial series. It runs on its own: the first half uses a signing key pre-configured on your trial, and the second half adds an approval requirement to that key using the admin workflow from Part 1: Admin Configuration. Part 1 is recommended, not required. Continue with Part 3: Issue a Device Certificate afterwards. New to the trial? Trial Environment covers the three hostnames, the seeded identities and keys, and how to switch identity in the browser.
In this tutorial you authenticate as a client, sign a binary with a key that needs no approval, and verify the result. Then you configure that same key to require human approval and run the complete workflow again (request, approve, sign, verify), the lifecycle a CI/CD pipeline automates.
The tutorial uses:
- The REST API, plus the UI for the admin and approval steps in the second half
- The signing key and identities pre-configured on your trial
- Standard command-line tools:
curl,jq,openssl,xxd, andg++(optional)
Uses Internal Authserver: trial only
This tutorial authenticates against the Keyserver's built-in internal Authserver, which exists for evaluation and testing only. Production deployments must authenticate through an external OAuth2/OIDC provider such as Azure Entra ID or GitLab OIDC. See the Authentication Model.
If the approval check in Step 5 prints false, a previous run skipped Step 16. Do it first.
Prerequisites
This tutorial is written for Ubuntu 24.04. Install the tools it uses:
xxd converts the hex signature to binary in Step 7. On some minimal images it comes with vim-common rather than as its own package.
On macOS with Homebrew:
xxd and a C++ compiler (clang++) ship with the Xcode command line tools. Run xcode-select --install if you do not have them, and substitute clang++ for g++ in Step 4. Other Linux distributions work too; replace apt with your package manager.
Set the base URLs for your trial environment:
export KEYSERVER="https://keyserver.<UNIQUE-ID>.cryptera-security.io"
export AUTHSERVER="https://authserver.<UNIQUE-ID>.cryptera-security.io/oauth2/token"
If a step produces an empty value
A failed request can leave a variable empty and only break a step or two later. To see the error, re-run the command with --fail-with-body added to curl and -e added to jq:
curl then prints the server's error body and exits non-zero, and jq -e exits non-zero on a null result, so the failure surfaces at the step that caused it.
Step 1: Authenticate as a Client
You authenticate as fw-client, a pre-registered client subject allowed to request signing operations. It already carries the QUICKSTART_FW role, wired to the key you use below, so the first half of this tutorial needs no role setup.
Trial credentials
On a standard trial, the seeded subjects (fw-client, and adminuser and approver-fw in the second half) use the password password. Check your getting-started email if your trial was configured differently.
Create a Base64-encoded credential string and request an OAuth2 access token:
export CLIENT_ID=fw-client
export CLIENT_SECRET=password
export AUTH_CREDS=$(printf '%s' "$CLIENT_ID:$CLIENT_SECRET" | base64 | tr -d '\n')

export TOKEN=$(
  curl -sS --tlsv1.3 \
    -X POST \
    -H "Authorization: Basic $AUTH_CREDS" \
    -d "grant_type=client_credentials" \
    "$AUTHSERVER" | jq -r .access_token
)

[ -n "$TOKEN" ] && [ "$TOKEN" != null ] && echo "Token received"
Expected output:
If nothing is printed, the credentials were rejected. Check the client name, password, and AUTHSERVER URL.
Step 2: The Quick-Win Signing Key
Your trial ships with one signing key already usable end to end: fw-quickstart, an EC (secp256r1) key with a SHA-256 hash and 0 required approvers. You can view it at https://keyclient.<UNIQUE-ID>.cryptera-security.io/signingkeyadmin.
Completed Part 1? Use the key you built instead
The tutorial-fw key from Part 1 has the same algorithm and hash as fw-quickstart. To use it, set export KEYID="tutorial-fw" and substitute tutorial-fw for fw-quickstart throughout, including the admin steps. Skip the full-chain check after Step 7: your Part 1 role cannot read tutorial-root.
Submit a hash made with the key's hash algorithm. The Keyserver does not check the length: with an RSA key a different hash gives a signature that does not verify, and with an ECDSA key the signature verifies only against the hash algorithm you used.
Step 3: Retrieve the Public Certificate
Fetch the key's certificate so you can verify the signature locally in Step 7:
curl -sS --tlsv1.3 \
  -H "Authorization: Bearer $TOKEN" \
  "$KEYSERVER/api/keys/$KEYID" | jq -r .certificate \
  > certificate.pem
Confirm it is a valid PEM certificate:
Expected output:
OpenSSL 3.0.x (Ubuntu 24.04's default) prints spaces around =, as above; OpenSSL 3.2 and newer print CN=fw-quickstart, .... Both are the same name.
Step 4: Build and Hash a Test Binary
Create and compile a simple program (or use any existing file as hello.bin):
cat > hello.cpp <<'EOF'
#include <stdio.h>
int main() {
    printf("Hello World!\n");
    return 0;
}
EOF

g++ hello.cpp -o hello.bin
Hash the binary with the key's hash algorithm:
Expected output, a 64-character hex string (SHA-256 produces 32 bytes). Your value differs from the one below, because the binary depends on your compiler and its version:
Only this hash is sent to the Keyserver. The binary stays on your machine.
Step 5: Request a Signing Operation
A signing operation is a time-limited ticket that defines which key is used, how many times, for how long, and with what description (shown to the approver, if one is required).
export OPERATION_ID=$(
curl -sS --tlsv1.3 \
-X POST "$KEYSERVER/api/operations" \
-H "Authorization: Bearer $TOKEN" \
-H "Content-Type: application/json" \
-d '{
"validms": 600000,
"description": "Signing Hello World example binary",
"new-keyusagerestrictions": [
{ "keyid": "'"$KEYID"'", "maxusagecount": 1 }
]
}' | jq -r .id
)
echo "$OPERATION_ID"
Expected output, an operation UUID:
Every operation carries an approval state, even one that needs no human approver. Confirm it:
curl -sS --tlsv1.3 \
-H "Authorization: Bearer $TOKEN" \
"$KEYSERVER/api/operations/$OPERATION_ID" | jq .approved
Expected output:
fw-quickstart requires 0 approvers, so the operation is approved as soon as it is created.
Step 6: Request the Signature
With the operation approved, submit the sign order:
export SIGNATURE=$(
curl -sS --tlsv1.3 \
-X POST "$KEYSERVER/api/signorders" \
-H "Authorization: Bearer $TOKEN" \
-H "Content-Type: application/json" \
-d '{
"operationid": "'"$OPERATION_ID"'",
"keyid": "'"$KEYID"'",
"inputdata": "'"$HASH_TO_SIGN"'",
"inputformat": "hex",
"inputpadding": "none",
"signatureformat": "asn1",
"description": "Hello World example signing"
}' | jq -r .result
)
echo "$SIGNATURE"
Expected output, a hex-encoded, ASN.1 (DER) signature:
Seeing Need more approvers or Operation has expired?
A 409 "Need more approvers" means the operation is not approved yet. A 410 "Operation has expired" means the validms window ran out: create a new operation as in Step 5: Request a Signing Operation and submit again.
Each sign order consumes one usage from the operation's maxusagecount. With maxusagecount: 1, a second sign order against this operation would be rejected.
Step 7: Verify the Signature
Convert the hex signature to binary, extract the public key from the certificate, and verify:
printf '%s' "$SIGNATURE" | xxd -p -r > hello.bin.sig
openssl x509 -pubkey -noout -in certificate.pem > pubkey.pem
openssl dgst $HASH_ALG -verify pubkey.pem -signature hello.bin.sig hello.bin
Expected output:
A device bootloader performs the same check, using only the public certificate.
If the full chain must be validated
Verifying against the leaf certificate (above) is enough for most consumers. Some verifiers, for example a bootloader that trusts only a burned-in root of trust, must instead validate the whole chain up to the root. fw-client can also read fw-quickstart's root, fw-quickstart-root, so you can fetch it and verify the chain without any extra permission setup:
curl -sS --tlsv1.3 \
-H "Authorization: Bearer $TOKEN" \
"$KEYSERVER/api/keys/fw-quickstart-root" | jq -r .certificate \
> root-certificate.pem
openssl verify -CAfile root-certificate.pem certificate.pem
Expected output:
GET /api/keys/{keyid} returns only that key's certificate, so the root is fetched separately.
Step 8: Modify the Binary to Fail Verification
To see verification catch tampering, modify the binary so it no longer matches what was signed:
cat > hello.cpp <<'EOF'
#include <stdio.h>
int main() {
printf("Hello _Modified_ World!\n");
return 0;
}
EOF
g++ hello.cpp -o hello.bin
Verify again:
Expected output: verification fails and the command exits non-zero.
OpenSSL 3.x may print an extra EVP_DigestVerifyFinal line first. That line is part of the same failure.
Any change to the binary invalidates the signature.
hello.bin on disk is now the modified build and no longer matches $HASH_TO_SIGN. Step 13 restores it before the second signing run.
Now Protect the Key
So far every object you used (the key, the role, the client) came pre-configured on your trial. The rest of this tutorial has you configure them, using the admin workflow from Part 1: Admin Configuration. You require an approver on fw-quickstart, build the approver role, attach it to a seeded human user, and re-run the same signing flow to see it come back pending instead of signing immediately.
If the role fw-quickstart-approver exists from an earlier run, reuse it and skip Step 11. If it was deleted, re-creating it under the same name gives you an empty role; re-add its natures.
Step 9: Start an Administrative Session
- Log in to
https://keyclient.<UNIQUE-ID>.cryptera-security.ioasadminuser. - Click Admin, enter a description (for example
Requiring approval on fw-quickstart), and click Create. - Wait for the yellow Authorizers badge. On a trial with one administrator,
adminuserself-authorizes immediately.
See Step 1: Log in and start an administrative session of the Admin Configuration tutorial for the full walkthrough.
Step 10: Require an Approver for fw-quickstart
This changes a shared key until you undo it
Raising the approver count changes fw-quickstart for everyone using this trial. The first half of this tutorial then fails at Step 5 (approved is false) and Step 6 (409 Need more approvers) until Step 16 sets it back to 0.
- Click Keys in the navigation bar and find
fw-quickstart. - Click the edit (pencil) icon.
- Change Required Approvers from
0to1. - Click Save.
fw-quickstart now requires one human approval before any sign order against it can succeed.
Step 11: Create an Approver Role
Never give one subject both fwsigner and approver on the same key
fw-client already has fwsigner on fw-quickstart through QUICKSTART_FW. Do not attach fw-quickstart-approver to it: a subject holding both can create and approve its own operations. Keep the roles, and the subjects, separate. The Keyserver does not enforce this; see Approval Workflow.
- Click Roles in the navigation bar, then Create.
-
Enter the header fields. Name:
Description:
-
Add natures:
user: required on every role assigned to a human userapprover: tickfw-quickstartwhen the key checkboxes appear
- Click Save.
The approver nature adds approve, getapprovals, and revokeapproval, scoped to the ticked keys. See the Nature reference.
Step 12: Attach the Role to the Seeded Approver
Your trial seeds a human user, approver-fw, for this purpose. It starts with no roles attached.
- Click Subjects in the navigation bar and find
approver-fw. - Click the edit (pencil) icon.
- In Associated Roles, tick
fw-quickstart-approver. - Click Save.
Step 13: Restore the Binary and Re-run the Operation
Step 8 left hello.bin no longer matching $HASH_TO_SIGN. Rebuild the original binary and re-hash it, so the signature you request matches the file you verify in Step 15:
cat > hello.cpp <<'EOF'
#include <stdio.h>
int main() {
printf("Hello World!\n");
return 0;
}
EOF
g++ hello.cpp -o hello.bin
export HASH_TO_SIGN=$(openssl dgst $HASH_ALG hello.bin | awk '{print $2}')
echo "$HASH_TO_SIGN"
This prints the same hash as in Step 4.
Now repeat Step 5 and Step 6 with the same commands and the same $KEYID. This time, the operation comes back not approved:
curl -sS --tlsv1.3 \
  -H "Authorization: Bearer $TOKEN" \
  "$KEYSERVER/api/operations/$OPERATION_ID" | jq .approved
Expected output:
The Step 6 command now prints null: the sign order fails, so the response has no result. Add --fail-with-body to its curl (see the tip at the top of this page) to see why:
Step 14: Approve as approver-fw
You are still signed in as adminuser from Step 9, and you must approve as a different person. Opening the approvals URL in the same browser keeps the session you already have, so close out the administrative identity first:
- Click Admin, then Revoke to close the administrative session you opened in Step 9.
- Sign out of the Keyserver UI.
- Open a private/incognito window, or a separate browser profile. Otherwise the login page can continue your existing
adminusersession, and the approval is recorded against the wrong user.
Then:
- Open
https://keyclient.<UNIQUE-ID>.cryptera-security.io/approvaladmin. -
Log in as:
-
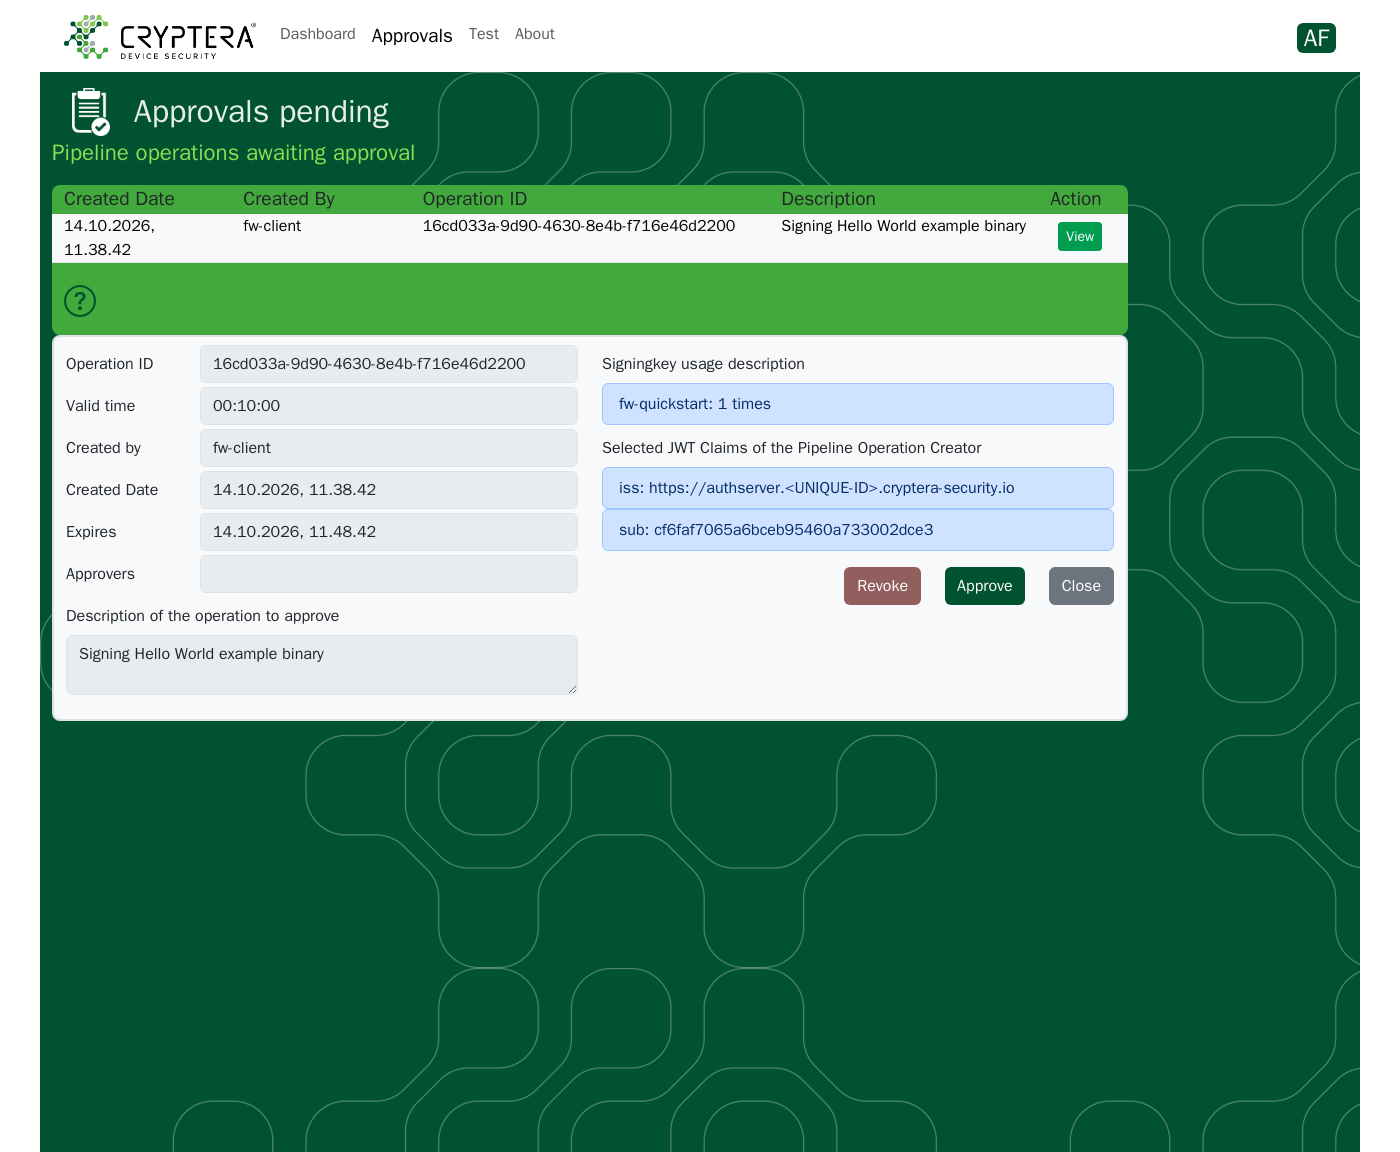
Locate the pending operation. The description from Step 5 identifies it.
-
Review the details and click Approve.
What you just approved
The approval authorizes use of fw-quickstart, once, within the operation's validity window. It does not cover a specific binary: the hash is not sent until the sign order in Step 15. See What an approver authorizes.
Back in the terminal, confirm the operation is now approved:
curl -sS --tlsv1.3 \
  -H "Authorization: Bearer $TOKEN" \
  "$KEYSERVER/api/operations/$OPERATION_ID" | jq .approved
Expected output:
A CI pipeline runs this polling call in a loop while waiting for approval. See Integrate the Keyserver with GitLab CI.
Step 15: Sign Again
Submit the sign order as in Step 6. It now succeeds, having required a human approval. Verify it as in Step 7, with the same certificate and procedure.
Step 16: Restore the Quick-Start Key
Put fw-quickstart back the way you found it, so the zero-approval quick start works the next time you or a colleague run the first half:
- Sign in as
adminuseragain (not in the approver-fw private window) and start an administrative session as in Step 9. - Click Keys, find
fw-quickstart, and click the edit (pencil) icon. - Change Required Approvers from
1back to0, then click Save. - Click Subjects, edit
approver-fw, and untickfw-quickstart-approver. - Click Admin, then Revoke to close the administrative session.
You can leave the fw-quickstart-approver role in place. An unattached role grants nothing.
If something fails
| Symptom | Cause and fix |
|---|---|
| No token in Step 1 | Wrong credentials or AUTHSERVER URL |
401 on any API call | Token missing or expired. Re-run Step 1 |
401 "The user/client is not valid" | The client ID does not match a registered subject |
403 "Access forbidden" | The subject's role lacks permission for this key |
409 "Need more approvers" | Operation not approved yet. Expected between Step 10 and Step 14; approve it there. In the first half, a previous run skipped Step 16 |
410 "Operation has expired" | validms elapsed. Create a new operation |
410 "Operation is cancelled" | The operation was cancelled, by an approver's Revoke or by DELETE /api/operations/{id}. Create a new operation |
410 "Signing key has been revoked" | The key is revoked and can no longer be used. Use another key |
Verification failure in Step 7 | Hash algorithm mismatch, or the binary changed after hashing |
Verification failure in Step 15 | Step 13 was skipped. Re-run it from the top |
Operation stays approved: false after Step 14 | Wrong operation approved, or approver-fw still lacks the role. Recheck Step 11 and Step 12 |
approver-fw cannot see the operation in the Approvals page | fw-quickstart-approver not attached to approver-fw, or the approver nature was not scoped to fw-quickstart. Recheck Step 11 and Step 12 |
| Yellow Authorizers badge never appears (Step 9) | See Part 1's troubleshooting table |
The Approvals page shows no pending operation, or the approval is recorded against adminuser | The browser is still signed in as adminuser. Sign out and use a private window (Step 14) |
Full reference: Error Codes.
Completion
You have now:
- Signed with a zero-approval key, verified the signature, and seen verification reject a tampered binary
- Required a human approver on that key and watched the same flow wait for, then receive, approval
- Restored
fw-quickstartto its zero-approval state
Next steps: automate this flow in your pipeline with the GitLab CI or Azure DevOps guide, or continue to Part 3: Issue a Device Certificate.
Production setup recommendations
The API calls are identical in production; authentication, operation limits and approval policy change. See Sign Code Using the REST API. To check signatures before you publish an artifact, see Verify a Signature.