How-To: Create and Manage Keys in the Keyserver
Signing keys are key pairs held in the HSM (or, as a per-key exception, in the KEYSTORE; see Key Location). They are used as:
- the trust anchor in certificate chains (ROOT keys)
- the issuer of device certificates (CA keys)
- the signer of firmware and software (FW keys)
This page covers creating, editing, importing and revoking keys, and retrieving their certificates.
Production Authentication Required
Key creation and management are high-privilege actions. In production they must be performed by identities authenticated through your external OAuth2/OIDC provider (Azure Entra ID, GitLab OIDC, ...). The internal Authserver is for trial environments only.
Prerequisites
- Access to the Keyserver UI at
https://keyclient.<UNIQUE-ID>.cryptera-security.io - A subject whose role includes the
keyadminNature - Familiarity with the key types
Step 1: Start an Administrative Session
- Click Admin in the navigation bar.
- Enter a Description, for example
Creating new production firmware signing key. - Click Create.
If your deployment requires more than one authorizer, the session stays pending until another administrator authorizes it. The Admin page shows Authorizers ( N of required M ):. See Administrative Sessions.
Step 2: Navigate to the Signing Keys Page
Click Keys in the navigation bar. The table has four columns:
| Column | Contents |
|---|---|
| ID | The key's Key ID |
| Type | ROOT, CA or FW |
| Status | NEW, INITIALIZED, REJECTED, RETRY or FAILED (see Step 3a) |
| Action | Edit (pencil; an eye for revoked keys), certificate (key icon) and revoke (bin) |
Algorithm, hash and approver count are not in the list. Open the key with the pencil icon to see them.
Step 3: Create a New Key
Click Create. A filled-in form for an FW key with a ROOT key selected:
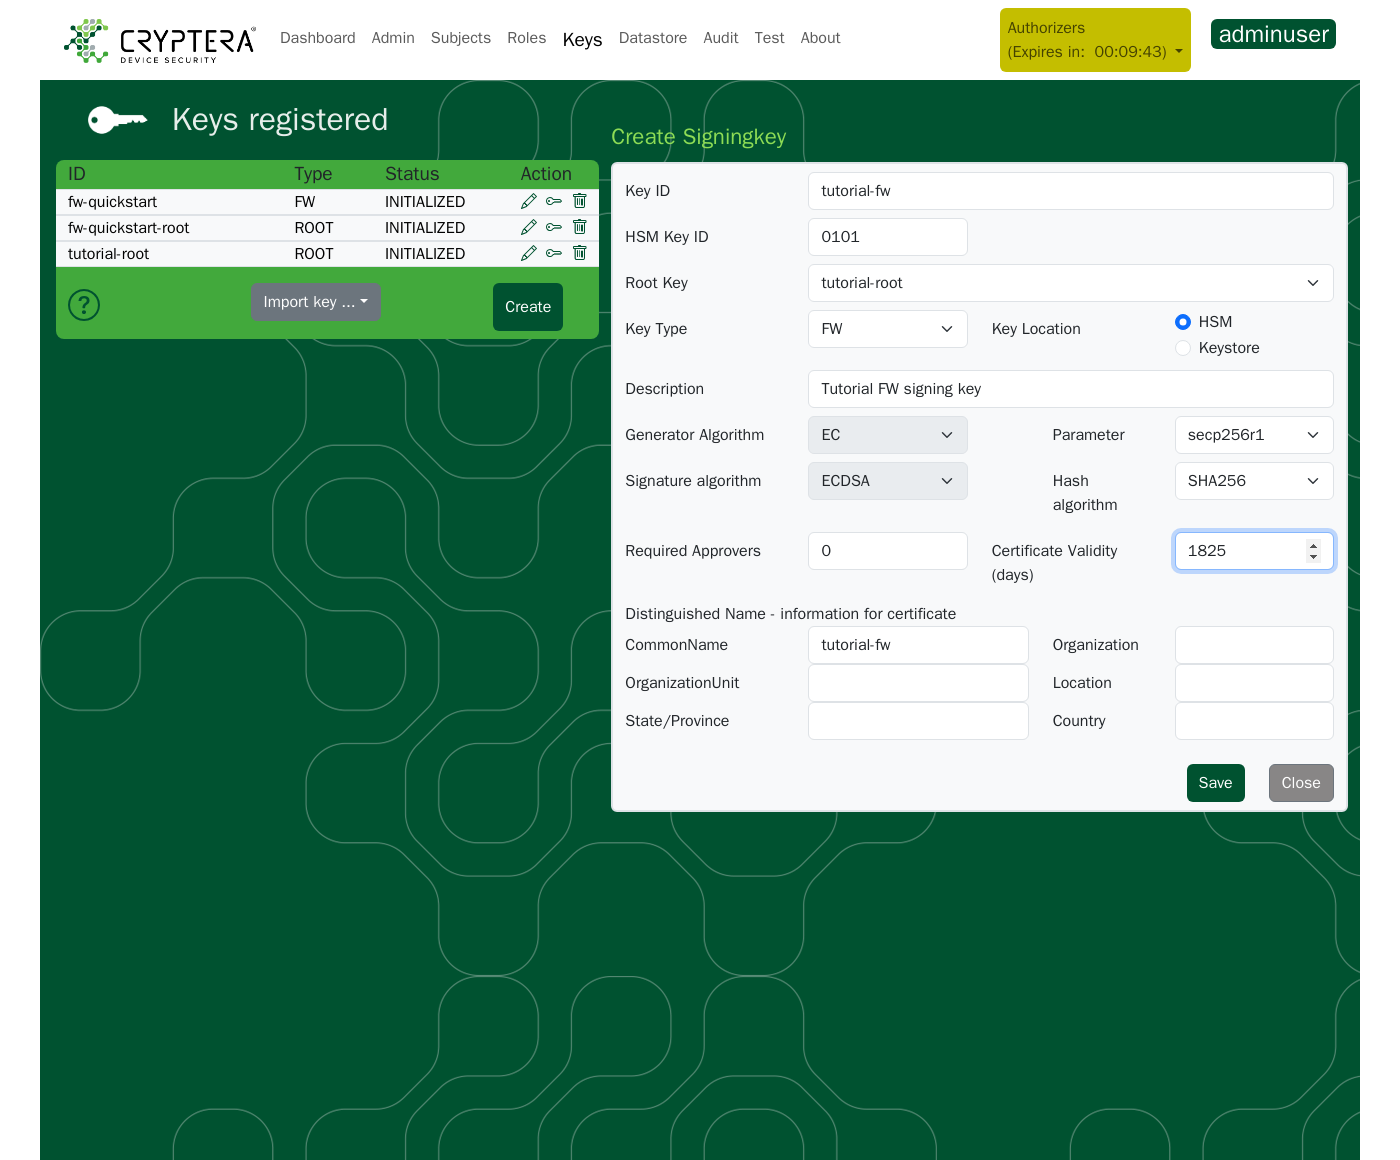
| Field | Values | Notes |
|---|---|---|
| Key ID | 4–64 characters: letters, digits, _, -, .. For example fw-prod-2025, device-ca-ecc384, root-ca-1 | The alias used in the API and by PKCS#11 clients. Cannot be reused, even after the key is revoked |
| HSM Key ID | Four hexadecimal digits, 0100–FFFE, no 0x prefix | The key handle inside the HSM. Must not be used by any other key, including revoked keys |
| Key Type | ROOT, CA, FW | See Key Type |
| Root Key | An existing ROOT key, or Self Signed | CA and FW keys only. See Root Key |
| Key Location | HSM, Keystore | See Key Location. Cannot be changed once the key is INITIALIZED |
| Description | 8–256 characters | |
| Generator Algorithm | EC, RSA | Read-only when a Root Key is selected |
| Parameter | EC: secp256r1, secp384r1, secp521r1. RSA: 2048, 3072, 4096 | Curve or key size. See Key Algorithms |
| Signature algorithm | ECDSA, RSA | Set from the Generator Algorithm; read-only |
| Hash algorithm | SHA256, SHA384, SHA512 | Fixed for the key's lifetime. Submit a hash made with this algorithm. The Keyserver does not check the length: with an RSA key a different hash gives a signature that does not verify, and with an ECDSA key the signature verifies only against the hash algorithm you used |
| Required Approvers | 0 or more | Approvers needed per operation. Typical: 0 for a development key, 1 for a staging firmware key, 2 or more for production firmware, CA and ROOT keys. See Set Up and Run Approval Workflows |
| Certificate Validity (days) | For example 3650 (10 years) | Validity of the key's own certificate |
| Validity (days), under Issued Device Certificate | Days | CA keys only. Validity of the device certificates issued from CSRs (POST /api/certificates) |
The Distinguished Name fields come next; see Distinguished Name fields.
Key Type
- ROOT: the trust anchor. Issues CA key certificates and never signs firmware. Use one per trust domain, not one per system: firmware and device identity are normally separate hierarchies, each with its own ROOT.
- CA: sits below a ROOT and issues device certificates in the provisioning pipeline.
- FW: signs firmware or software, with ECDSA or RSA.
Full explanation: Key Types.
Root Key
Shown for CA and FW keys only; a ROOT key is always self-signed.
- Select an existing ROOT key to have it sign this key's certificate. The new key inherits the root's Generator Algorithm (read-only). Parameter is reset but stays editable. Hash algorithm is not inherited and must be set explicitly.
- Or select Self Signed: the key signs its own certificate. Choose this when an external CA will certify the key through a CSR. See Step 5a: Export a CSR for External CA Signing.
Key Location
Where the private key is generated and stored:
- HSM: inside the Hardware Security Module; the private key never leaves it in plaintext. This is the default, and the right choice for production ROOT, CA and FW keys.
- Keystore (
KEYSTOREin the API): an encrypted file-based store. The private key can be exported withGET /api/keys/priv/{keyid}(audited, permission-gated).
See Key Storage for the difference.
Use KEYSTORE only when the key must leave the Keyserver
For example, a build chain that embeds the key on the device. Do not use it for production firmware or CA keys: a KEYSTORE private key can be exported.
Selecting Keystore opens a confirmation dialog; click Accept to keep it.
Distinguished Name fields
The subject fields of the key's certificate. All are optional except that CommonName defaults to the Key ID when left empty. Fill them in for production keys: verifiers and auditors see them in the certificate.
| Field | Certificate attribute | Max length |
|---|---|---|
| CommonName | CN | 64, defaults to the Key ID if empty |
| Organization | O | 64 |
| OrganizationUnit | OU | 64 |
| Location | L | 128 |
| State/Province | ST | 128 |
| Country | C | 2 (ISO 3166 two-letter code) |
Click Save to generate the key pair. The new key appears in the key list.
Step 3a: Key Status Lifecycle
After Save, the key moves through these statuses. It is not usable until it reaches INITIALIZED.
| Status | Meaning | Action |
|---|---|---|
NEW | Key record created, HSM generation queued | Wait; usually seconds |
INITIALIZED | Key generated and fully functional | Grant permissions |
REJECTED | The HSM refused the parameters | Edit the key (check Key ID, HSM Key ID, algorithm) and save again (Step 5) |
RETRY | Generated, but the HSM is temporarily unavailable | Wait for the HSM to reconnect; no action needed |
FAILED | The key has been revoked | Permanent |
Wait for
INITIALIZEDbefore granting permissions or testing. Until then,GET /api/keys/{keyid}andPOST /api/operationsreturn409"Signing key is not initialized!", and the key is missing fromGET /api/keys.
Step 4: View or Export a Key's Certificate
- Click the key icon next to the key.
- The Certificate tab shows the certificate in readable form. The PEM tab shows it in PEM format, with a button to copy it to the clipboard.
- To keep a copy, paste the PEM into a file such as
fw-prod-2025.pem.
Step 5: Edit an Existing Key
- Click the pencil icon next to the key.
- Change the editable fields:
- On an
INITIALIZEDkey: Description, Required Approvers, and the Issued Device Certificate Validity (days) (CA keys only). Everything else is fixed. - On a
REJECTEDkey: every field is editable, so you can correct the parameters the HSM refused.
- On an
- Click Save.
A revoked (FAILED) key opens read-only.
Step 5a: Export a CSR for External CA Signing
A self-signed CA or FW key can export a PKCS#10 Certificate Signing Request (CSR) for an external Certificate Authority. The CA returns a certificate that you import back, replacing the self-signed one. This is how a Keyserver CA key joins an existing PKI hierarchy.
Prerequisites:
- An active administrative session
- The key is self-signed: its Root Key field shows "Self Signed" in the edit panel
- The key is not a ROOT key (ROOT keys are trust anchors and cannot export CSRs)
Certificate re-import is currently not functional
Uploading the returned certificate fails with HSM error: Unable to update externally signed certificate on signingkey and leaves the certificate unchanged. This affects KEYSTORE keys and, in trial environments, HSM keys. CSR export works. To run a key with an externally issued certificate, import the key pair and certificate together as in Step 5b: Import an Existing Key; this works only for a key pair that exists outside the Keyserver.
Steps:
- On the Keys page, click the pencil icon next to the key.
- Click Get CSR in the button row (shown only when the prerequisites above are met).
- A
.pemfile containing the PKCS#10 request downloads. - Submit the
.pemto your external CA. - Upload the returned certificate in the key's edit panel with the Import External CA Certificate file input (shown under the same conditions as Get CSR).
Every CSR download creates a createcsr audit entry for the key. The CSR content is not stored in the audit data field. See Audit Coverage Reference.
Step 5b: Import an Existing Key
Use this only when migrating from previous signing infrastructure. An imported private key has existed outside the Keyserver.
The private key must be encrypted with the Keyserver's PGP public key; the Keyserver rejects any upload that is not a PGP-encrypted message.
Prerequisites:
- An active administrative session
- The key pair: the private key as a PKCS#1/#8 PEM file and its certificate as a PEM file
- An OpenPGP tool such as GnuPG (
gpg)
An imported key starts with 0 Required Approvers
The import form has no Required Approvers field, so the key is usable without approval as soon as a role grants access to it. After the import, edit the key and set Required Approvers before you grant any role access to the key.
Always download a fresh keyring before encrypting
The Keyserver's PGP key pair may be rotated. Download the public keyring and encrypt the private key immediately before each upload. A key encrypted against a stale keyring cannot be decrypted by the server, and the import fails.
Steps:
- On the Keys page, open the Import key ... dropdown.
- Click Download PGP public keyring for encryption.
-
Encrypt the private key with the downloaded keyring, using ASCII-armored output. With GnuPG:
-
In the dropdown, click Import PGP encrypted signingkey. The key form opens as "Import PEM Private Key/Certificate".
- Select the encrypted private key (
fw-legacy.pem.asc) under Import Private Key and the certificate PEM under Import Certificate. Both are required. Selecting the files fills Description with the private key's file name. - Fill in Key ID, HSM Key ID, Key Type and Key Location, and replace the Description (8–256 characters). The algorithm and parameter are read from the key, and the hash algorithm from the certificate's signature algorithm.
- For an imported ROOT key, copy each Distinguished Name field from its certificate's subject: the Keyserver uses them as the issuer name of keys created below it.
- For a CA key, set the Issued Device Certificate Validity (days).
- Click Save.
- Edit the key and set Required Approvers.
On success the key material is installed in the selected Key Location, Key Origin shows IMPORTED, and the key goes straight to INITIALIZED with no NEW phase.
An imported key is recorded as self-signed
Each imported key is stored as self-signed. The Keyserver does not record a chain between imported keys; the chain exists only in the certificates, which is what signing and verification use. An imported ROOT key can be selected as Root Key for new keys; an imported CA key cannot.
Step 6: Revoke a Key
A key cannot be deleted from the Keyserver. Revocation is the only way to take a key out of use, and it keeps the key's audit history and certificate.
Revocation is permanent
A revoked key cannot be restored. Calls that use it return 410 "Signing key has been revoked".
- Click the bin icon next to the key.
- Click Revoke in the confirmation dialog.
Revocation sets the key's status to FAILED, stops all further operations and signing with it, and removes its permissions from every role. A ROOT key cannot be revoked while it has non-revoked keys below it; revoke those first.
Revoke a key when it is deprecated, when compromise is suspected, or when its replacement is deployed.
Best practices for key management
- Separate keys per product or project. Do not reuse keys across unrelated products.
- Generate keys inside the HSM. Import keys only for migration.
- Rotate keys periodically: development keys often, production keys every few years, CA and ROOT keys rarely.
- Archive certificates in version control or secure storage for long-term validation.
If something fails
| Symptom | Cause and fix |
|---|---|
Key stays in NEW or RETRY | HSM generation is queued or the HSM is temporarily unavailable. Wait; no action needed (Step 3a) |
Key shows REJECTED | The HSM refused the parameters. Edit the key (check Key ID, HSM Key ID, algorithm) and save again (Step 5) |
409 "Signing key is not initialized!" on operations against a new key | The key is not yet INITIALIZED. Wait for generation to finish (Step 3a) |
| Signature does not verify | The submitted hash was not made with the key's Hash algorithm; the Keyserver does not check the length. Hash with the key's algorithm (Step 3) |
| Get CSR button not visible | The key must be self-signed and not ROOT, with an active administrative session (Step 5a) |
| Key import rejected: "Only PGP encrypted private keys (in PEM/ASC format) are allowed" (UI) or "Private key file is not a PEM encoded, PGP encrypted private key" (API) | The private key was uploaded unencrypted or without ASCII armor. Re-encrypt with --armor against a freshly downloaded keyring (Step 5b) |
410 "Signing key has been revoked" | The key was revoked (Step 6). Use its replacement |
Full status-code reference: Error Codes.
Related pages
- Manage Roles: granting
fwsignerorapproverNatures for the new key - Key Types and Storage, Operations and Approval Workflow: key types, and the operation and approval model
- Audit Coverage Reference: which key actions are audited