How-To: Manage Roles in the Keyserver
Roles define what a subject (user or client) may do in the Keyserver: create operations, approve them, manage keys, and so on. Some permissions apply globally, others to specific keys. This page covers creating, editing and deleting roles in the Keyserver UI.
Production Authentication Required
Role administration in production must be performed by identities authenticated through your external OAuth2/OIDC provider (Azure Entra ID, GitLab OIDC, ...). The internal Authserver is for trial environments only.
Prerequisites
- Access to the Keyserver UI at
https://keyclient.<UNIQUE-ID>.cryptera-security.io - A subject whose role includes the
useradminNature (for exampleadminuser)
Step 1: Start an Administrative Session
- Click Admin in the navigation bar.
- Enter a Description, for example
Creating roles for new firmware signing workflow. - Click Create.
If your deployment requires more than one authorizer, the session stays pending until another administrator authorizes it. The Admin page shows Authorizers ( N of required M ):. See Administrative Sessions.
Step 2: Open the Roles Page
Click Roles in the navigation bar. The list shows each role's Name and Description, with edit (pencil) and delete (bin) icons under Action. It includes the built-in roles KEYADMIN, USERADMIN and REVIEWER.
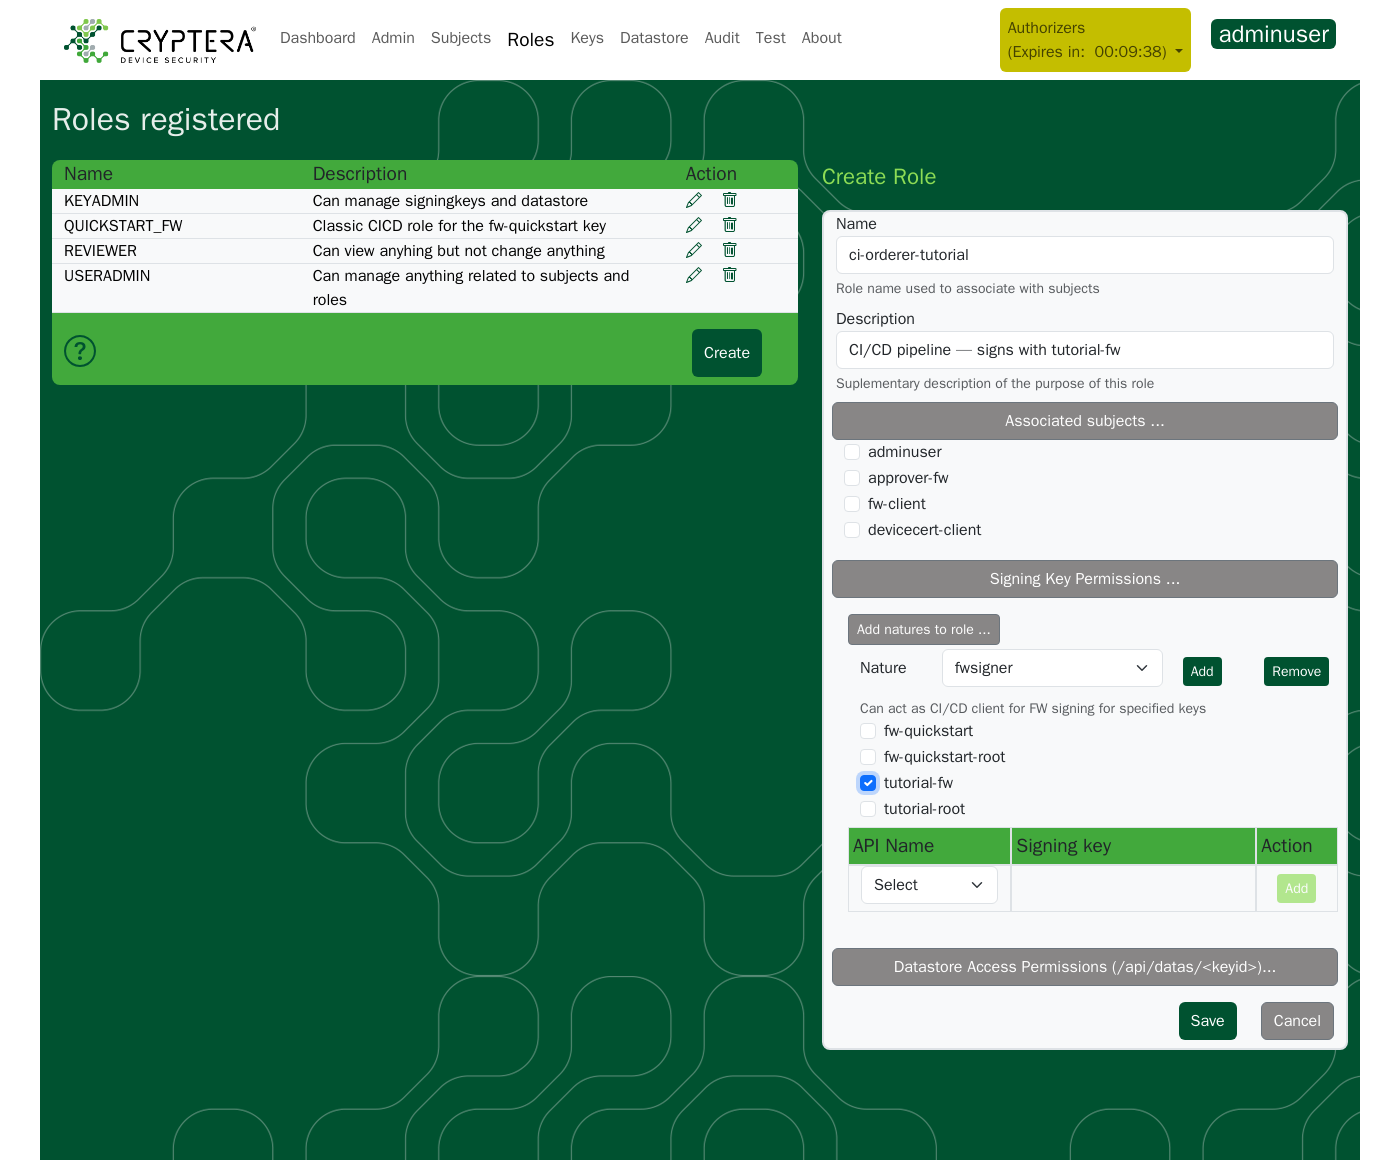
Step 3: Create a New Role
- Click Create.
- Enter a Name: a short, unique identifier, for example
ci-orderer-fw-quickstartorfw-approver-fw-quickstart. - Enter a Description, for example
Allows CI pipelines to request signing operations using fw-quickstart. - Optionally tick, under Associated subjects ..., the subjects that should hold the role. You can also assign it later from either page. See Step 5: Associate Subjects with a Role.
- Add permissions with Natures.
- Click Save.
A permission is an API name (such as createoperation or approve), tied to a signing key when the API name is key-scoped. To add one permission on its own, expand Signing Key Permissions ..., pick the API name from the Select dropdown, choose the key from Select signing key if the API name is key-scoped, and click Add. Datastore access is granted in the separate Datastore Access Permissions section. Listing the entries there needs the keyadmin Nature as well. See Grant a client access to an entry.
Step 3a: Using Natures to Add Permissions
It is recommended to use Natures rather than adding individual permissions manually. A Nature is a preset bundle of permissions for a common role type, so using one adds the minimal permission set for that role.
- Expand Signing Key Permissions ..., then click Add natures to role ....
- Select the Nature that matches the role's purpose.
- If the Nature is key-scoped, key checkboxes appear. Tick the signing key or keys.
- Click Add.
Repeat for each Nature the role needs, then click Save.
Remove (next to Add) deletes the selected Nature's permissions from the role, for the ticked keys if the Nature is key-scoped. It also removes permissions that another Nature on the role added, so check the permission table before you click Save.
Nature reference
| Nature | Intended for | Key-scoped? | Permissions added |
|---|---|---|---|
user | Any human user. Required on every user role | No | getconfigs, getuserinfo (basic UI access) |
keyadmin | Administrators managing signing keys and the datastore | No | Signing key CRUD, admin sessions, CSR export, datastore CRUD, statistics |
useradmin | Administrators managing subjects and roles | No | Subject/role CRUD, admin sessions, natures read, statistics |
authorizer | Administrators who authorize other admins' sessions | No | Authorizer add/revoke, admin session read |
fwsigner | CI/CD clients that create operations and submit sign orders | Yes | createoperation, order, getoperation, canceloperation, getallkeys, getkeys, getdata, getprivkeys |
devcertsigner | Provisioning clients that issue device certificates from CSRs | Yes | createoperation, createcertificate, getoperation, canceloperation, getallkeys, getkeys, getdata, getprivkeys |
approver | Humans who approve pending operations | Yes | approve, getapprovals, revokeapproval |
reviewer | Read-only access to configuration and audit log | No | Read access to subjects, roles, keys, sessions, audits, statistics, datastore list |
Key-scoped Natures (fwsigner, devcertsigner, approver) grant permissions only for the keys you tick when adding the Nature. To extend a role to more keys later, add the Nature again with the new keys ticked.
getprivkeys in the signer Natures is private-key export. It works only for KEYSTORE keys; for an HSM key the request returns 409 Private key cannot be retrieved for HSM based keys, so the permission has no effect there. See Key Location.
Step 3b: Worked Example, CI Orderer and Human Approver
This example builds two roles for a firmware signing workflow with human approval. First set Required Approvers to 1 or more on the key: the trial's fw-quickstart key ships with 0. See Create and Manage Keys in the Keyserver. The example uses fw-quickstart; substitute your own key ID.
Role 1: ci-orderer-fw-quickstart, for the CI pipeline
- Click Create.
- Name:
ci-orderer-fw-quickstart. Description:CI/CD pipeline, creates and submits sign orders for fw-quickstart. - Open Add natures to role ..., select fwsigner, tick
fw-quickstart, click Add. - Click Save.
Role 2: fw-approver-fw-quickstart, for the human approver
- Click Create.
- Name:
fw-approver-fw-quickstart. Description:Human approver for fw-quickstart signing operations. - Add the user Nature (required on every user role), then click Add.
- Add the approver Nature, tick
fw-quickstart, click Add. - Click Save.
Assign ci-orderer-fw-quickstart to your CI client subject and fw-approver-fw-quickstart to your approver's user subject. The approver sees pending operations on the Approvals page.
Keep signer and approver on different subjects
Never give one subject both fwsigner and approver for the same key. A subject that can create and approve its own operations defeats the approval workflow. See Approval Workflow.
Step 4: Edit an Existing Role
- Click the pencil icon next to the role.
- Change the Name, Description, associated subjects, Natures or individual permissions.
- Click Save.
Step 5: Associate Subjects with a Role
- Click the pencil icon next to the role.
- Expand Associated subjects ... and tick the subjects that should hold the role.
- Click Save.
You can also assign roles from the subject. See Assign or remove roles.
Step 6: Delete a Role
Check who holds a role before you delete it
Deletion does not check whether anything depends on the role. Subjects that still hold it lose its permissions and later get 403 responses. See Step 5: Associate Subjects with a Role.
- Click the bin icon next to the role.
- Click Revoke in the confirmation dialog.
KEYADMIN, USERADMIN and REVIEWER are permanent: the Keyserver rejects deleting or renaming them. Every other role can be deleted.
Deletion is permanent. See Delete a subject for soft-delete and name reuse.
Best practices for role management
- Use one role per key per responsibility, each built with the matching Nature scoped to its key:
ci-orderer-fw-quickstart(fwsigner),fw-approver-fw-quickstart(approver),ci-orderer-<other-key>,fw-approver-<other-key>. - Audit role changes regularly: filter the audit log for role creation, updates, deletions and subject assignments.
If something fails
| Symptom | Cause and fix |
|---|---|
| A role cannot be deleted or renamed | It is one of the three permanent roles, KEYADMIN, USERADMIN or REVIEWER (Step 6) |
| A re-created role has none of its former permissions | Deletion is permanent and re-creating the name makes a new role. Re-add its permissions and subjects (Step 6) |
| A user holding the role cannot use the UI | User roles must include the user Nature (Step 3a) |
A subject holding the role gets 403 on a key | The key-scoped Nature was added without that key ticked. Add the Nature again with the key ticked (Step 3a) |
Related pages
- Manage Subjects: assigning roles to users and clients
- Roles: the concepts behind Natures and permissions
- Monitor and Filter the Audit Log: reviewing role changes